

 – Light Arched Variant") € 1,95
€ 1,95 - Round Variant") € 1,95
€ 1,95 € 0,23
 € 1,56
 € 1,25
Everything there is to know about Nosag Springs
Published:
01-02-2025
Last updated: 04-11-2025
Klik hier voor de originele Nederlandse versie
Help — My Zigzag Spring Broke. Can I Repair It Myself?
Where can I buy a new nosag spring? What different types of sinuous springs exist? What is the correct name for that long, flat spring in my sofa? And how are nosag springs actually mounted?
If you recognise one or more of these questions, keep reading — the answers are most likely right here.
Or jump directly to the chapter you need:
Basics: Understanding Nosag Springs and Their Components
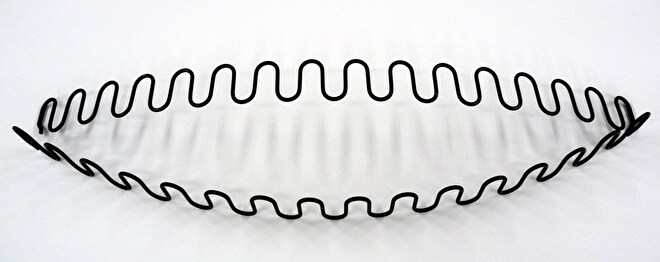
Fig.1. The Nosag Spring
The Nosag Spring, also known as Zigzag Spring
Unlike the older spiralette springs (Fig. 2), which are no longer available, the nosag spring moves in a smooth forward-and-back wave pattern. A major advantage of this design is the absence of steel-on-steel movement, which increases the lifespan of the spring and ensures silent performance — something the spiralette spring could never guarantee.
Fig. 2. De spiralette
Wire Thickness of Nosag Springs
Nosag springs are made of spring steel and manufactured in
various wire thicknesses to create different levels of
firmness:
2.8 mm, 3.0 mm, 3.2 mm, 3.4 mm, 3.6 mm, 3.8 mm and 4.0
mm.
General rule: the thicker the wire, the firmer (heavier) the spring.
-
Wire 2.8–3.4 mm → ideal for backrests (only counter-pressure needed).
-
Wire 3.6 mm and thicker → ideal for seat suspension (must support full body weight).
A frame equipped with nosag springs must be strong enough to withstand spring tension. The two common constructions are:
-
A hardwood beech frame with reinforcement rails.
-
A steel tube frame, also reinforced per seat section.
Modern furniture rarely uses nosag springs in the back; elastic webbing is usually sufficient. Seats, however, still rely heavily on nosag springs — most commonly 3.8 mm — because the load capacity can also be adjusted by modifying the distance between springs.
Spring pitch and Spring Dimensions
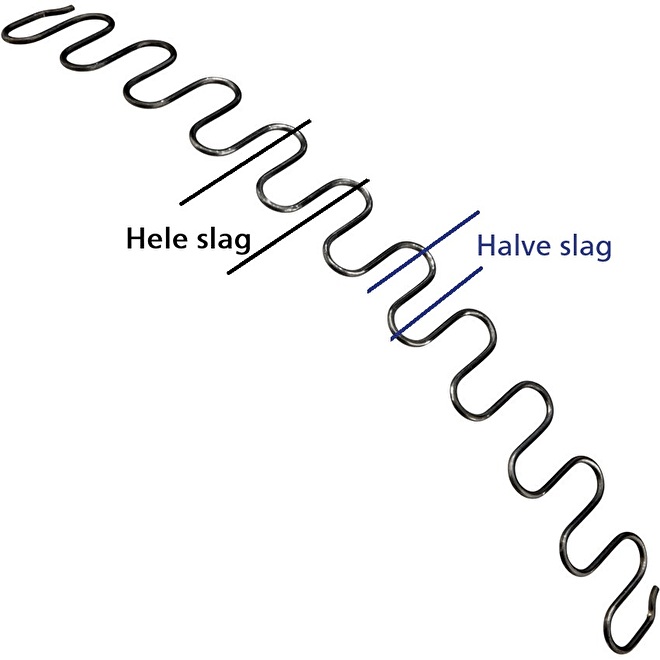
Fig. 3. Spring Pitches: Whole pitch ("hele slag") and Half pitch ("halve slag")
Since the original British patent holder of the “No-Sag Springs”
no longer exists, there is no longer any industry-wide standard for
the width of the spring or the size of its pitch (the distance from
one wave to the next).
The only thing manufacturers still consistently agree on is what
constitutes a full and half pitch of a nosag
spring.
For example, our springs are approximately 4.5 cm wide, with a pitch of roughly 4 cm from start to end. However, in practice we frequently encounter springs that are wider, and some with pitches of up to 6 cm.
When replacing a spring, it is essential to compare
these measurements carefully.
If you replace just one spring in the middle of a seat, even small
differences in width or pitch can cause the seating surface to
develop a visible bump or dip — or simply create a noticeable
difference in comfort.
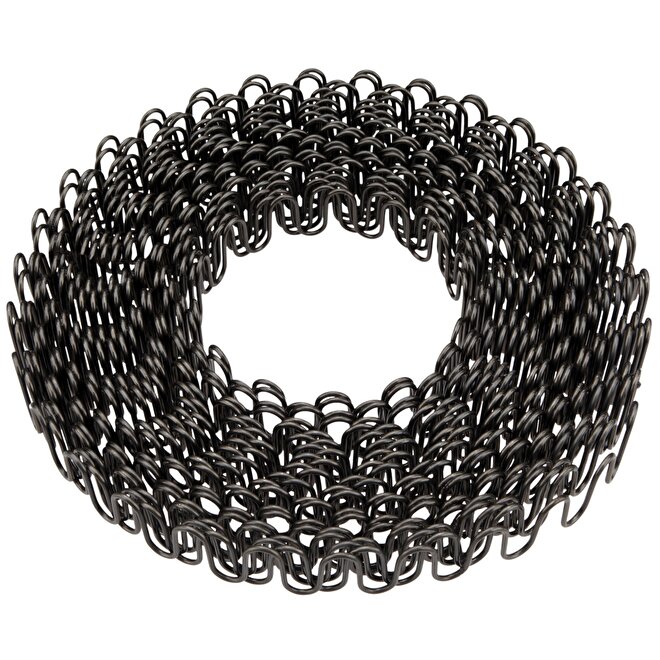
Fig.4. Nosag Spring on Roll
Spring Shape
The first springs were supplied to the furniture industry in
large, long rolls of 30 to 50 metres, and perhaps even longer (Fig.
4).
The furniture manufacturer then had to cut the spring to the
desired length themselves.
This resulted in the springs being almost entirely round, but
never equally round everywhere: the curvature on the outside of the
roll is naturally much less than the curvature you see in the
middle of the roll.
This strong curvature of the spring also makes it impossible to
tension the spring flat, with the result that the spring plane
stands 5, and sometimes even 10 to 15 centimetres higher in the
middle than the top of the frame.
You are then forced either to accept a domed seat, or to level out
the height difference between the lower edges and the higher middle
by adding a layer of padding underneath.
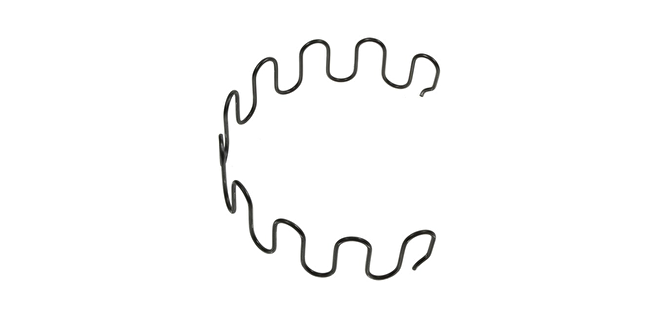
Fig.5. Pre-cut round Nosag Spring
Of course, even though the nosag spring already existed,
developments in this area did not stand still. As the spring became
more and more widely used in the furniture industry, it became very
attractive for manufacturers—primarily to reduce labour costs—to
have
the round nosag springs supplied pre-cut in a predetermined
standard length.
The springs no longer needed to be cut; they could be taken from
the pallet and assembled directly into the furniture.
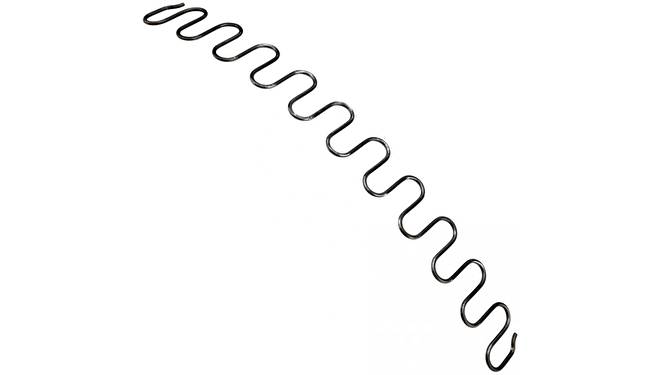
Fig.6. Pre-cut light curved Nosag spring
And once production of the spring could be adjusted to meet
demand, it also became appealing to have the nosag spring
manufactured
with only a light curvature.
When this nosag spring is tensioned in the frame, the result is a
flat seat. This brings many advantages with it:
-
A round spring only begins to perform its function (springing) once it has bent downward as far as it originally arched upward in its unloaded state. The flat spring responds immediately.
-
Because a round spring has to bend down so far first, it runs the risk—due to the counter-pressure, and because the human backside is not a flat shape—of not bending straight down but shifting sideways or, in the worst cases, flipping over. To prevent this, nosag springs were coupled with cord, edge wire, or elastic straps.
Even though this is unnecessary with flat springs, elastics or couplings are still regularly found in furniture because manufacturers want to increase the support surface. However, this was NOT the original reason for coupling. -
Because a lightly curved spring can be tensioned flat, a protective cloth and a flat layer of padding can be applied directly on top. This enabled new possibilities for high-quality, slim, streamlined furniture designs.
How are Nosag Springs attached?
Clips, Tube Hooks en Clip Strips
|
Fig.7a. Standard Nosag clip |
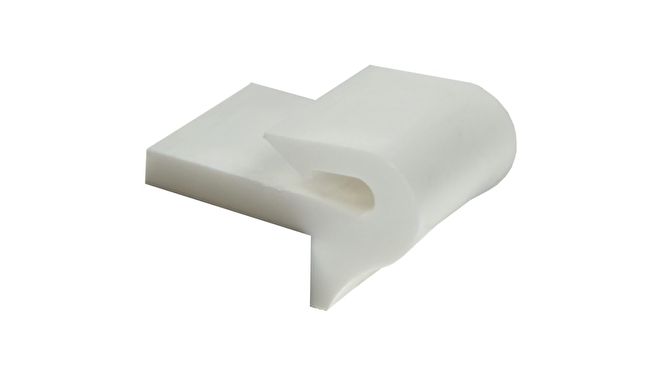
Fig. 7b. Full plastic nosag clip with barb |
|
Fig.7c. Nosag Tube Hook |
Fig.7d. Nosag Clip Strip |
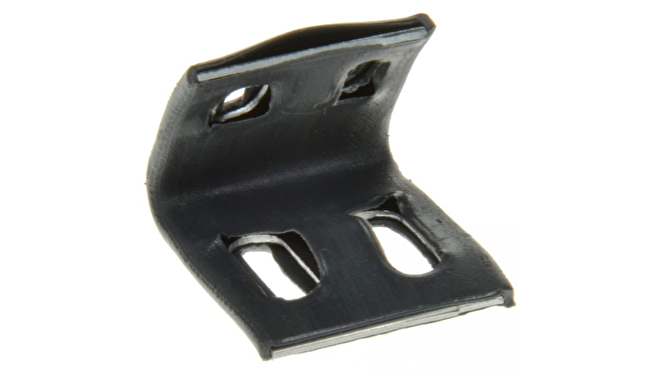
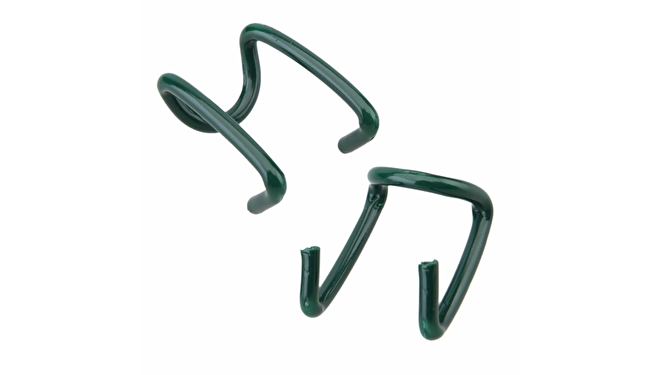
There are various ways to attach nosag springs today. The most
important requirement is that they meet one main condition: the
attachment must be developed and installed in such a way that the
spring hangs “free” within the frame.
In other words, the spring may not sit on or over
the rail to which it is attached. This is because the spring—both
the round and the lightly curved version—is round by nature.
If you attach it on or over the rail, it will start to work itself
loose. This must always be taken into account when choosing the
type of attachment and when determining the correct spring
length.
You may also notice in the images (Fig. 7a–d) that all the
mounting materials—clips and clip strips—are entirely or partially
made of plastic. Even the earliest clips, the predecessors of Fig.
7a, were mostly metal but already had a plastic piece in the inside
curve.
The reason for this is that nosag springs move when used. And
moving metal against metal produces an unpleasant noise that no one
wants to hear coming from their furniture. A plastic coating on the
clip or tube hook, or a clip made entirely of plastic, prevents
this issue.
Both the
standard clip and the plastic clip can be attached in multiple
ways.
As you can see in the video, screws can be used, but the earliest
clips were secured with serrated nails—spikes with a serrated edge
around the shaft for extra grip.
Of course, that method required much more time.
The industry soon switched to the tacker, an industrial upholstery
stapler, which used long staples.
This brought enormous time savings but also a major drawback:
staples, even upholstery staples, are made of much softer metal,
meaning that even well-installed clips will eventually loosen under
the constant tension. The staples eventually break and can no
longer hold the clip securely in place.
To determine placement of the springs, the heart-to-heart
(centre-to-centre) distance is measured based on seat depth. This
is usually between 8 cm and 12 cm HoH, and the deeper the seat, the
closer the springs are positioned.
Once the spacing is measured and marked, the clips are
attached.
The advantage of the full-plastic clip over the standard clip is
that it includes a “spacing guide”—a corner-shaped piece that
aligns the clip against the rail so that it automatically rests at
the correct overhang.
The disadvantage is that this clip, because of its barb, is
suitable only for seats where the rails are perfectly opposite one
another.
If used on a curved rail, the nosag spring would hang halfway out
of the clip and would not be mounted safely for long-term
durability.
Once the clips are installed, the springs are hung. As
mentioned, with the plastic clip no additional action is needed;
the barb secures the spring.
The standard clip, however, must be tapped flat and then secured
with one or two additional nails, screws, or staples to keep the
clip closed.
The most recent development for wooden frames is the clip
strip.
These are pre-manufactured in a standard center-to-center spacing
and supplied in rolls of several hundred clips.
You simply cut the desired length, staple it on the wooden frame,
and hang the spring.
And this is not even the newest version: there was a newer type,
widely used for a short time, but already withdrawn from the market
by Dutch wholesalers because it was drastically inferior.
To reduce material costs, the eyelet was made from three or four
small plastic rings fused together with a few weld spots.
The result: in most furniture where these were used, the eyelets
broke off the strip within 1 to 2 years — leading to a massive
number of justified warranty complaints.
Many manufacturers are therefore reverting to the earlier
clip-strip type.
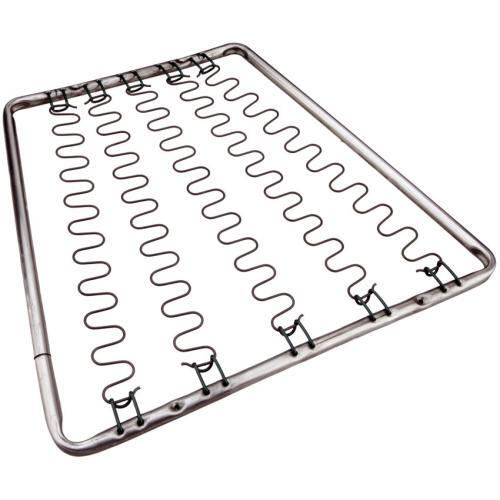
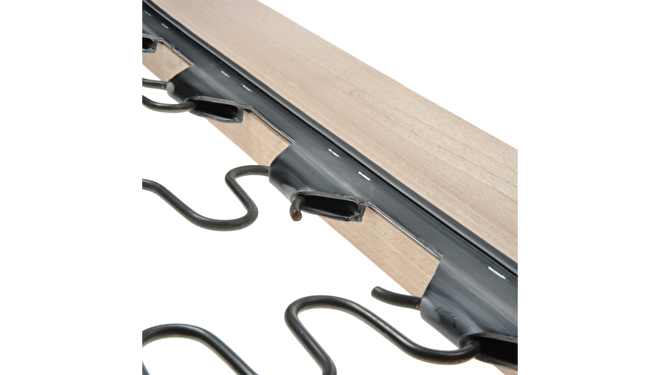
Fig.8. Pre-assembled nosag tube-frame under-seat
The last form of nosag attachment is the
nosag tube hook or tube-frame hook.
This type of attachment has changed little over the years. The
earliest hooks were uncoated, but this was quickly improved.
However, this variant did spark other developments.
Factories began producing standard pre-assembled tube frames of
around 55×65 cm, allowing furniture manufacturers to make only the
outer frame and cushions.
Other factories offered custom-sized tube frames made to the
manufacturer’s specifications.
There was also the option of delivering the frames already
pre-upholstered.
This allowed for the development of larger pieces of furniture
where the wooden frame was reinforced with a metal inner frame to
which the springs could be attached.
All in all, the tube hook opened the door to numerous new possibilities.
The Repair
Precautions !Before you begin repairing the springs yourself, there are several risks you need to be aware of. Be aware that the ends of the springs are so sharp that
you can easily injure yourself on them. As a precaution, always wear safety glasses and work gloves when installing springs, and keep your head as far away from the spring as possible. |
How do I replace a Nosag Spring or Nosag Clip myself?
The preferred method of installing a nosag spring is always on
the top side of the seat rail.
An upholsterer will therefore always strip the furniture down to
the bare frame when the internal structure needs to be repaired or
replaced.
They will then remove the springs where necessary, install new
clips, and finally reinstall the old or new springs.
However, this ideal situation is unfortunately not always
possible.
Often, the furniture is still in perfectly good condition, and only
one or a few springs have snapped or the clips have come loose.
In that case, the furniture will certainly not be stripped;
instead, a temporary repair method is used.
When the attachment consists of tube hooks, the spring can be
easily hooked in from underneath as long as the hooks are still
intact.
If the hooks are broken, it becomes slightly more difficult, but in
most cases they can still be replaced from below.
The same applies to hard-plastic clips and clip strips when they
are still intact: simply unhook the broken spring and hang the new
one in.
However — if these types of clips are damaged, the job becomes more difficult…
In that case, you will have to remove the old clips, because installation from below is only possible with the standard clip, and the old clips would get in the way.
Once the old clips have been removed, you should install the
standard clip on the inside of the rail (as shown
in the video).
Always use screws for this; nails or staples will
be worked loose in no time, and you will have to start all over
again.
Install the clip at a height where the spring sticks out just
slightly above the rail (where it originally sat).
The standard clip is first screwed into the wood using its long
side.
Then the spring is hooked in with the curve facing the seat, the
short side of the clip is tapped down slightly, and then it can
also be screwed securely.
Repeat this in exactly the same way on the opposite rail, and the job is done.
The finishing touch
Coupling Springs with Nosag Elastics, Coupling Cord or Steel Wire

One finishing method that is often used is coupling the
springs.
A commonly mentioned argument is that this increases the support
surface by distributing the weight across more springs than the one
directly underneath.
If the springs are tied together with coupling cord or edge wire (a
2–3 mm thick steel wire), this is somewhat true — but with nosag
elastics, the distribution is minimal.
The real reason this technique originally came into use is that
the old springs cut from the roll were so arched
that they ran the risk of bending sideways when someone sat
down.
To keep the spring moving in its correct path, it was tied to the
neighbouring springs so that it could only compress straight
downward.
Nowadays, when springs are coupled at all, it is almost always
done with
rubber nosag elastic bands.
Do not forget to tie the outer springs to the sides of the frame as
well with cord or elastic bands.
Otherwise, the elastic bands — which are under tension — will pull
all the springs toward the centre of the seat.
Also keep in mind that the elastics need to be inspected and
replaced regularly.
Because they are made of solid rubber, they last only about
4 to 5 years, after which they dry out and
deteriorate, making them no longer functional.
If all of the above work has been completed, you are
finished.
Or almost finished.
If the furniture has an open frame (with the springs normally
visible), the job is done.
If the furniture is usually closed underneath, you may want to
install a new piece of bottom cloth for a neat finish — but that is
entirely up to you.
Of course, it is possible that something is still unclear or
that you have comments or suggestions.
No problem — let us know at +31 (0)10 412 42 16 or
info@pootendop.nl
Good luck!!
About the AuthorThis article was written by
Wout Meilink Jr., a furniture upholsterer since
1995 in the family business founded in 1938 by his great-uncles.
From this rich tradition, he combines craftsmanship with a passion
for guiding DIY enthusiasts and hobby upholsterers. Over the years,
he and his team have trained more than 15 apprentice upholsterers
and supported countless course participants and do-it-yourselfers
in reupholstering their furniture. Curious about the materials you can
use for your own projects?
|

Betaalmethoden
![]()
![]()
![]()
![]()
![]()
![]()
![]()
![]()
![]()
![]()
![]()
Shopping cart
Volg ons op:
![]()
![]()
Of neem contact op via:
![]()
![]()
(ma. t/m vr. tussen
9.00 en 16.00)